Sunday, July 6, 2014

It's a puppet!


So I've been missing for an age because of exams and stuff, but I thought I'd show you guys my latest crafty piece. It's something I haven't posted about this before but I make puppets, I have made 4 so far, they take a lot of work but it's quite good fun. Anyway, this is an exam piece which means I wasn't allowed to post about it until after the exams were over and corrected. We haven't got any results back yet but I know it's been corrected so I thought I'd share.

She was made in accordance with the theme "A Slave to Fashion". I decided to create a model who takes the ideals of fashion to the extreme. I created a wooden skeleton and used brass hooks and eyes for her joints. Her body is made first from newspaper to bulk out her shape, then I used plasticine (I couldn't find any air-drying lightweight clay) to mold the protruding ribs and collar bones etc. Then I used, I can't remember the name of it, but it's a superlightweight builders polyfiller, I used that over the plasticine to give me a solid, fairly smooth surface I was able to paint. Most importantly her body remained light. I fashioned her hands, feet and head in the same way.


I then painted her and began to add details. I painted in shadows around to make the molded bones stand out. I didn't have a huge amount of time so I simple painted eyes, lips and eyebrows on. I shortened and glued false lashes on and with my hot glue gun I glued on cheap hair extensions before cutting them to my desired length.

Her clothes were incredibly simple. I bought a cheap thin summer scarf and tied knots into the corners. I wrapped them around her neck, halter style and knotted them together, then added a few stitches to secure.
I then draped the cloth and pinned it together starting just at the base of her spine and running to her feet. I, very quickly, I was running out of time! stitched it together and created a hem at the length I wanted. And that's about it.


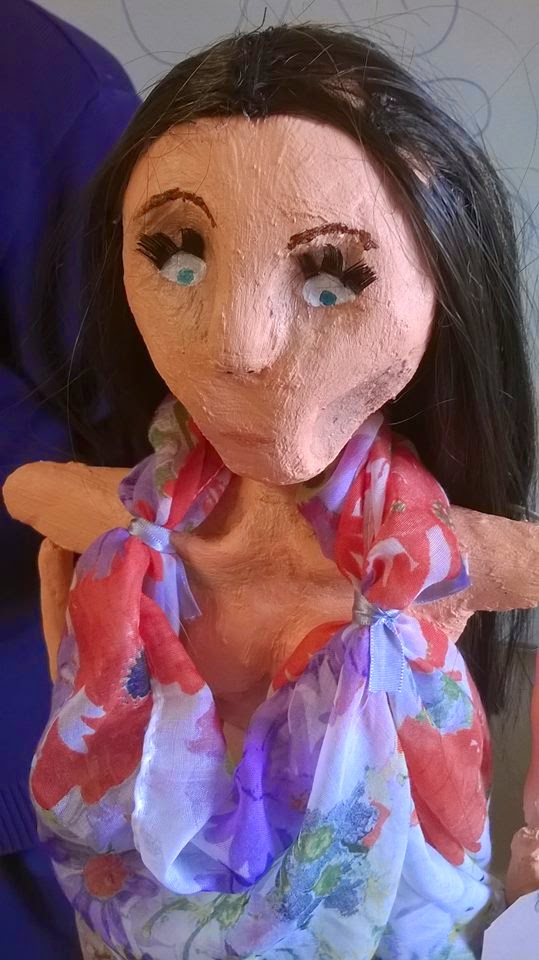
This was part of my Leaving Certificate Art exam, I chose the craft option and puppetry within that. I was able to craft the shape of her body post exam, and then during the exams I had 5 hours to do everything else. I was working until the last second. As part of the art exam I had to do a 15 minute full body life sketch, and a 30 minute "significantly detailed" head to elbow sketch.. I also did a big still life piece. The final element of my Art exams was an art history paper which I had to study pre-christian art and renaissance art. 

Now I just have to cross my fingers and hope that I get a good grade for it. I am praying for at least a B1 (80%)

Tuesday, February 4, 2014

Caviar Nails

It has been months and months since I last posted but school is just exhausting lately I've had no time to do anything!

I did read some amazing books I'd definitely recommend reading, Maria V. Snyder is the author, anything by her seems to be brilliant!!

I've also started knitting a hat, I'm not really using a pattern, or have any idea how it's going to turn out, but when it's finished I will put up photos of how I succeeded or quite possibly failed in knitting a hat!

In other crafty things I've been doing my nails a lot, it seems to be the only thing I have time for!

These are called Caviar Nails and I love it, it's such a statement even when it's just on one nail. It's a bunch of little beads stuck to your nail creating a really cool eye-catching texture.


So I bought all my pots of beads from Dealz for only €1.49. I got 10 cute little bottles of all different colours.
I decided to go for baby pink this time and painted my nails a base colour as similar as I could to the colour of the beads.


I painted all my nails with two coats, except one, I left that with just one coat whilst all the others dried.
Then I put a LOT of nail polish on my ring finger, quickly while this was still wet I poured lots of the beads onto my nail. Make sure to have a little tray or pot underneath to catch the ones that don't stick!

Then, press down gently onto the beads to smooth them, make them stick and it also spreads them evenly across my nail. Don't worry if they overflow a bit, ones they majority are dry you can just knock them off as they won't actually be stuck to your nail.


Finally, paint with a top-coat so that less chipping occurs et violá!


P.S. sorry for the poor quality of the photographs, it's hard to get decent lighting in my house in the winter!

Sunday, July 28, 2013

Flower Nails! Yay!


So I started off with a natural green for the base, this nail polish is quite thick so I only needed one coat. You might need two.


Once that is done you need to build your flowers out of little dots. I used a white for the centre of mine. I have this special little tool I use for making dots but a blunted toothpick or orange stick will work just as well.


Put a blob on the end of your dotting stick (I have no idea what this tool is actually called!) Not too much or it will make a mess of your nail.

Put one or two white dots on each nail. Remember that each is the centre for a flower so don't put them too close together or near the edge of your nail.


You will need two more colours to make up the rest of the flowers, both of these are from Penneys and are pretty good for the price of them.

Using the same method as the white central dots put five dots circling the central one 


 Repeat for all the nails, leave them dry then apply a top coat! And there you have it, quick cute nails!

Wildly show them all to your friends and let them know where you got the idea!

Wednesday, July 3, 2013

Caviar Nails


GUYS!!! CAVIAR NAIL ART!!!
Why haven't I tried this before!! It is so cute, for my first try it's okay, I didn't use enough beads BUT still very cute, I couldn't decide on a colour so mixed up loads of of different ones!

Just paint a base coat on, let it dry then put a really thick layer of paint on and pour tons of beads onto it. Make sure you have a tray underneath to catch all the excess beads. Let the beads settle and press down on the nail gently, brush the excess beads off the side of your nail and voila!!
Let it dry for 15 minutes and apply a clear top coat.
I got a small set of 10 different colours for €1.50 in Dealz, I'd recommend getting a small set first, experimenting and then if you love it (which I know you totally will) buy a larger bag of beads from e-bay for like 99p!

Not my photo but they turned out exactly like this

Next time I do them I am going to put on plenty more beads than this.


(photo credit: www.nailart.ph)

Friday, June 21, 2013


Sorry I haven't posted in 3 weeks!

I've been on holiday in sunny Mablethorpe and I just wanted to post a couple of snaps to promote the Help The Heroes charity and the Royal British Legion.

There's a man called Christian who is walking the entire coast of Britain for charity and my Grandad got all dressed up in his uniform to greet him.
 

Check out https://www.facebook.com/christian.britain.3 to find out more about him.

There was also a gentleman called Jamie there who had had a stroke and hadn't walked since it, but Christian inspired him so much Jamie decided he would walk 60 paces with Christian.

And he did it YAY Jamie!!


Wednesday, May 29, 2013

Pastel Nails!

NEW POST!!! YAY!! I always get excited when it's new post day!

Nails today, nice summery pastelly yellows and purples!


I painted a base colour of purple, which I got from Primark/Penneys. It goes on really thick so I only needed one coat.

Tip: Paint the lightest colour as the base. I didn't and some of it went a funny colour.

I then cut some really thin strips of sticky tapes, put them on the thin strips on my nails on the places I didn't want to go yellow and then I painted quite a thick coat of yellow on top. I let this dry and then CAREFULLY removed the tape.

I left 2 nails solid colours because I thought that would break up the designs nicely and not make them too busy. I put dots on one of my thumbs because I couldn't think of anything else to do. :p


Don't forget to check out me Etsy shop:


Saturday, May 4, 2013


I know Wednesday has come and gone but I can't get my photos off my memory card onto my computer :( sorry!
I did paint very pretty nails but I can't show you the tutorial yet, bear with me please!


I am going to upload some photos of the jewellery I make though, which you can buy if you so desire, just visit my etsy shop called prettythingsimake or, because I might not have the item on Etsy, you can email me jazzieshaw@gmail.com.

I love the colour green, I think it's so versatile and you can find a shade to suit any complexion sooo..

Here's my Green Compliation!


These ones ^^^ are so adorable!! made with the standard pin and fish hook, there's 3 beads on the, the main one is gorgeous it's a clear glass bead with a pastel green centre and golden strips around the outside!


I adore the colour combo of this, apple green is a close second of my favourite greens, (the first being teal) the colourful detail really makes them pop! These were a bit more fiddly and complicated to make as I was using wire instead of the pins...


And finally! Simple and elegant dark green beads, the bottom beads have a matte finish, which you don't see very often with glass beads! These ones were made in the same basic way as the first.

So there you have it.
3 pairs of earrings.
3 different styles.

But all in fabulous GREEN!